


Hi welcome! In today's tutorial, you will learn how to easily authenticate React Apps using Firebase.
For a contemporary IT stack, Firebase is one of the most popular Backend-as-a-Service alternatives. The Firebase platform includes solutions for authentication, file storage, hosting, and analytics, in addition to a NoSQL database called Firestore. The Firebase SDK is available for mobile, Unity, Java, C++, and the web, among other platforms. Web developers will use Firebase in an entirely new way with Firebase Web v9. Web apps powered by Firebase Web v9 will run faster, load faster, and substantially improve both the user and developer experience with the introduction of a completely revamped, modular, functional programming approach and the inclusion of a Firestore "lite" library.
In this article, you will learn how to authenticate users in a React application using Firebase.
Outline
Requirements/Prerequisites for authentication with Firebase
Create React App
Setting up Firebase
Integrating Firebase into our App
Requirements
NodeJS installed. if you don't have it installed, you can get it from here
A code editor. I use Visual Studio Code because of its full-fledged features
A Google account to use Firebase
Basic knowledge of React
Create React App
Navigate to your C:/ drive or any place you are comfortable with and enter the following command in the terminal to create a new React app:
npx create-react-app react-firebase-auth
Replace react-firebase-auth with the name you have given your application. Open Visual Studio Code in that directory once the installation is completed. Then, to launch the app, open the Integrated Terminal (Ctrl+J in Windows, Cmd+J in MacOS) and type the following command:
npm start
This screen showing on your browser means you have successfully created your React app.
React installation comes with some default files that won't be needed moving forward, so it is best to remove them and start on a clean slate. App.test.js, logo.SVG and setupTests.js should all be deleted from the src folder. Also, delete the contents of App.css. Clean up the App.js file too and have something like this:
import './App.css';

function App() {
  return (
    <div className="App">

    </div>
  );
}

export default App;
We are going to proceed to install firebase to connect with Firebase services, as well as react-router-dom to implement the application's routing. To manage the user's authentication state, you employ react-firebase-hooks.
npm install firebase react-router-dom react-firebase-hooks
Creating necessary components
We need to create four components: login, register, reset password, and dashboard. Create the files along with the .css file for each component.
Then we build the routes before designing the pages. To set up routes for your pages, go to the App.js file and make this import:
import { BrowserRouter, Routes, Route} from "react-router-dom";
NB: We are using react-router-dom version 6, which replaced Switch with the Routes.
Add the following to the JSX part of App.js file and import the components to enable routing for your app:
<BrowserRouter>
      <Routes>
        <Route exact path="/" element={<Login />} />
        <Route exact path="/register" element={<Register />} />
       <Route exact path="/reset-password" element={<ResetPassword />} />
       <Route exact path="/dashboard" element={<Dashboard />} />
      </Routes>
</BrowserRouter>
Now our routes are set up and working fine. We now proceed to design each page.
Login Page
Now set up the login page. Add this code to the login.js file:
import { Link } from "react-router-dom";

import "./account.css";

const Login = () => {
  return (
    <div className="container">

      <div className="container-left">
        <div className="wrapper-left">
          <div className="part-one">
            <h3>Get started</h3>
            <p>Login</p>
          </div>
          <div className="inp">
            <form >
              <label htmlFor="email" className="email">E-mail </label>
              <input
                className="inp-left"
                type="email"
                placeholder="example@gmail.com"
                id="email"
                name="email"
              />
              <label htmlFor="password" className="pass">Password </label>
              <input
                className="inp-left"
                type="password"
                placeholder="password"
                name="password"
                id="password"
              />
              <Link className="text-align-right"  to='/reset-password'>Forgot password?</Link>
            </form>
          </div>
          <div className="buttons">
            <button className="btn-one">Login</button>
            <button className="btn-two">
              Sign in with google
            </button>
          </div>
          <div className="down">
            <p>Don't have an account?</p>
            <Link to='/register'> Create your account </Link>
          </div>
        </div>
      </div>
    </div>
  )
};

export default Login
Then add the styles for the login page in account.css because you will use the same style for the register.js and reset-password files.
.container-left {
    width: 350px;
    margin: 50px auto;
    padding: 20px 10px 40px;
    border-radius: 10px;
    border: 1px solid #d3d3d5;
    background-color: #fff;
  }
  /* part-one-left-start  */
  .wrapper-left .part-one {
    width: 100%;
    height: 100px;
    border-radius: 10px;
    background-color: #eaf2ff;
    padding: 30px 20px;
    margin-bottom: 40px;
  }
  .wrapper-left .part-one h3 {
    color: #195bc9;
    margin-bottom: 4px;
  }
  .wrapper-left .part-one p {
    color: #02021a;
  }

  .wrapper-left .inp form {
    display: flex;
    flex-direction: column;
    position: relative;
  }
  .wrapper-left .inp form .inp-left {
    border: 0;
    outline: none;
    width: 100%;
    border: 1px solid #d7d6db;
    border-radius: 7px;
    height: 40px;
    margin: 15px 0;
  }
  .wrapper-left .inp form input::placeholder {
    font-size: 12px;
    color: #9d9d9f;
  }
  .wrapper-left .inp {
    position: relative;
  }
  .wrapper-left .inp form input[type="email"],
  input[type="password"], input[type="text"] {
    padding: 0 10px;
  }
  .wrapper-left .inp form input[type="email"]:focus {
    border: 1px solid #115efa;
  }
  .wrapper-left .inp form input[type="password"]:focus {
    border: 1px solid #115efa;
  }
.wrapper-left .inp form input[type="text"]:focus {
    border: 1px solid #115efa;
  }
  .wrapper-left .inp form label {
    color: #01000d;
  }
  .wrapper-left .buttons {
    display: flex;
    flex-direction: column;
    margin: 15px 0;
    gap: 12px;
  }
  .wrapper-left .buttons .btn-one,
  .btn-two {
    border: 0;
    cursor: pointer;
    width: 100%;
    height: 45px;
    border-radius: 25px;
  }
  .wrapper-left .buttons .btn-one {
    background-color: #115efa;
    color: #fff;
    font-size: 16px;
    font-weight: 500;
  }
  .wrapper-left .buttons .btn-two {
    background-color: #fff;
    border: 1px solid #d9d9db;
    font-size: 16px;
    margin-bottom: 5px;
  }

  .wrapper-left .check label {
    position: absolute;
    cursor: pointer;
    font-size: 12px;
    line-height: 21px;
    text-align: center;
    padding: 0 33px;
    text-align: left;
  }
  .wrapper-left .check label input[type="checkbox"] {
    position: absolute;
    opacity: 0;
    cursor: pointer;
    height: 0;
    width: 0;
  }


  .wrapper-left .down {
    position: relative;
    font-size: 14px;
    top: 20px;
  }
  .wrapper-left .down p {
    display: inline-block;
  }
  .text-align-right {
    text-align: right;
  }
  /* part-one-left-end  */
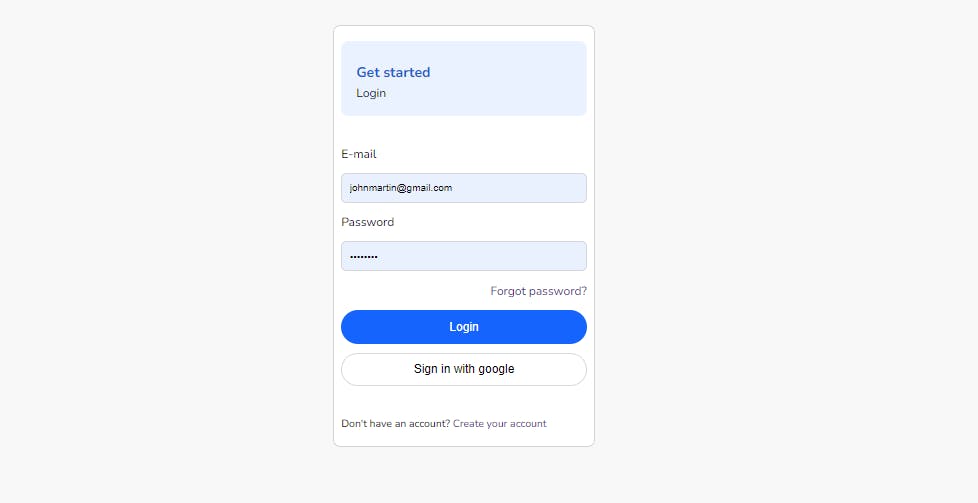
And that is it, you have your login page done. Here is how it looks:
Register Page
Now you create the register.jsfile:
import { Link } from "react-router-dom";

import "./account.css";

const Register = () => {
    return (
        <div className="container">

      <div className="container-left">
        <div className="wrapper-left">
          <div className="part-one">
            <h3>Get started</h3>
            <p>Register</p>
          </div>
          <div className="inp">
            <form >
              <label htmlFor="name" className="name">Name </label>
              <input
                className="inp-left"
                type="text"
                placeholder="John Doe"
                id="name"
                name="displayName"
              />
              <label htmlFor="email" className="email">E-mail </label>
              <input
                className="inp-left"
                type="email"
                placeholder="example@gmail.com"
                id="email"
                name="email"
              />
              <label htmlFor="password" className="pass">Password </label>
              <input
                className="inp-left"
                type="password"
                placeholder="password"
                name="password"
                id="password"
              />
            </form>
          </div>
          <div className="buttons">
            <button className="btn-one">Register</button>
            <button className="btn-two">
              Sign up with google
            </button>
          </div>
          <div className="down">
            <p>Already have an account?</p>
            <Link to='/'> Log in </Link>
          </div>
        </div>
      </div>
    </div>
    )
}

export default Register
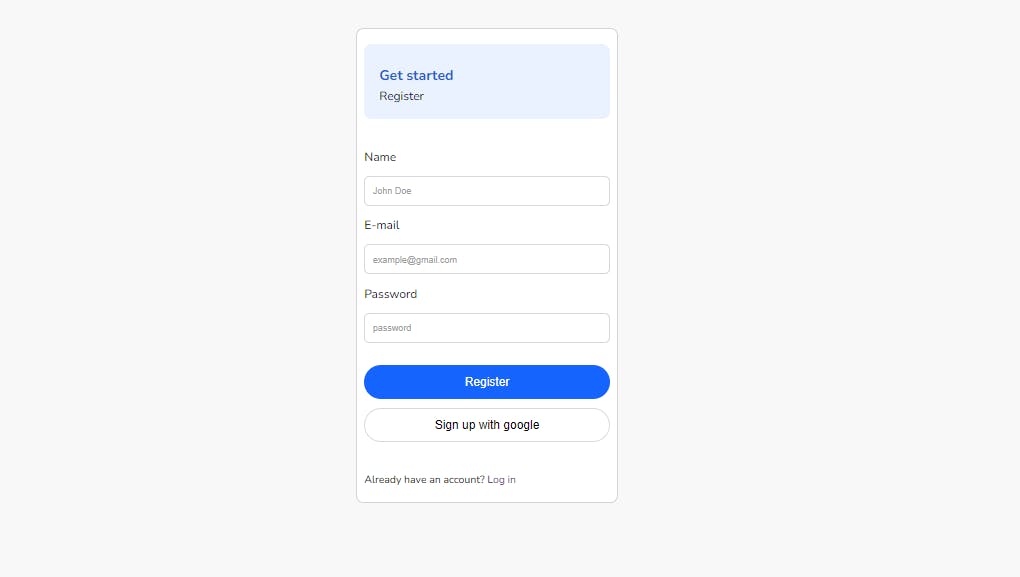
It looks like so:
Reset Password
Now for the reset-password file:
import "./account.css";

const ResetPassword = () => {
  return (
    <div className="container">
      <div className="container-left">
        <div className="wrapper-left">
          <div className="part-one">
            <h3>Reset Password</h3>
          </div>
          <div className="inp">
            <form >
              <label htmlFor="email" className="email">E-mail </label>
              <input
                className="inp-left"
                type="email"
                placeholder="example@gmail.com"
                id="email"
                name="email"
              />
            </form>
          </div>
          <div className="buttons">
            <button className="btn-one">Reset Password</button>
          </div>
        </div>
      </div>
    </div>
  )
};

export default ResetPassword
So to keep it very simple, a dashboard will eventually show the name of the logged-in user and a button for logging out.
Setting up Firebase
Since we are done creating all the necessary components and configuring the routing for our application, we need to set up our project in firebase. To get underway, visit Firebase Console on your browser. Proceed to log in with your Google account.
After that, click Add project, and you should see the following screen:
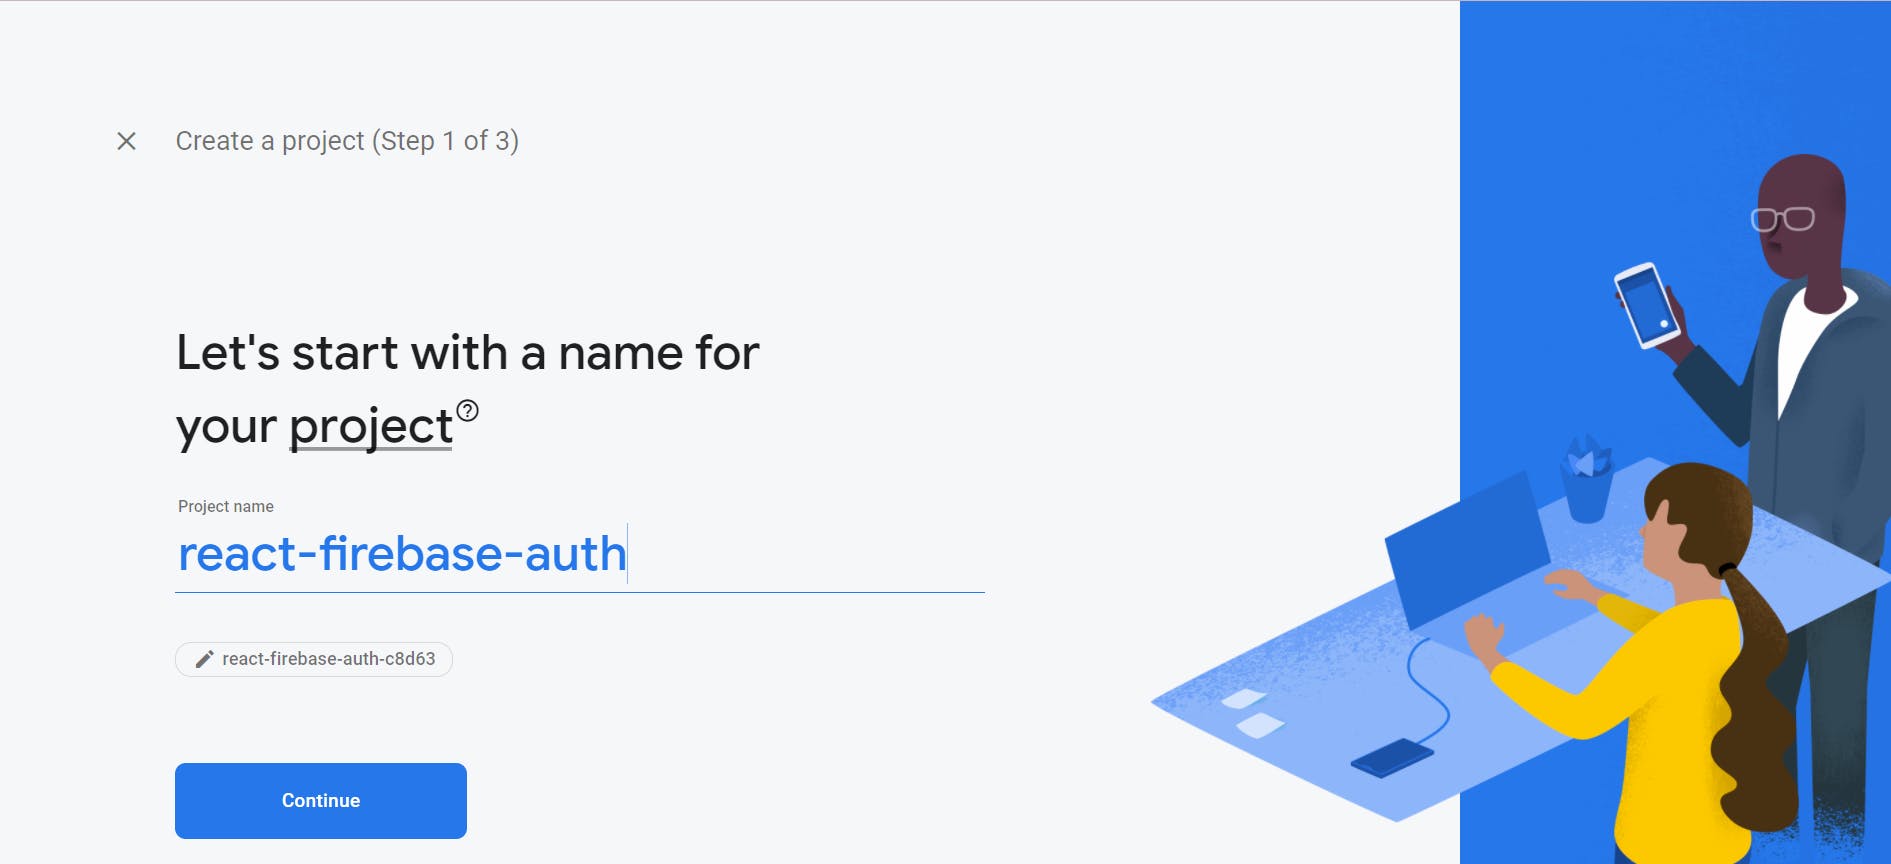
Choose your desired project name, I used react-firebase-auth. Press Continue, You will be presented with a choice to enable Google Analytics or not. It is not a necessity for this tutorial since it is for learning purposes. Then press Create Project for your project to be created. Sip your coffee, and relax a little while Google sets up everything for you.
After the process is completed, you should be provided with a dashboard. At the left-side menu, select Authentication, then click Get started to see several authentication modes available.
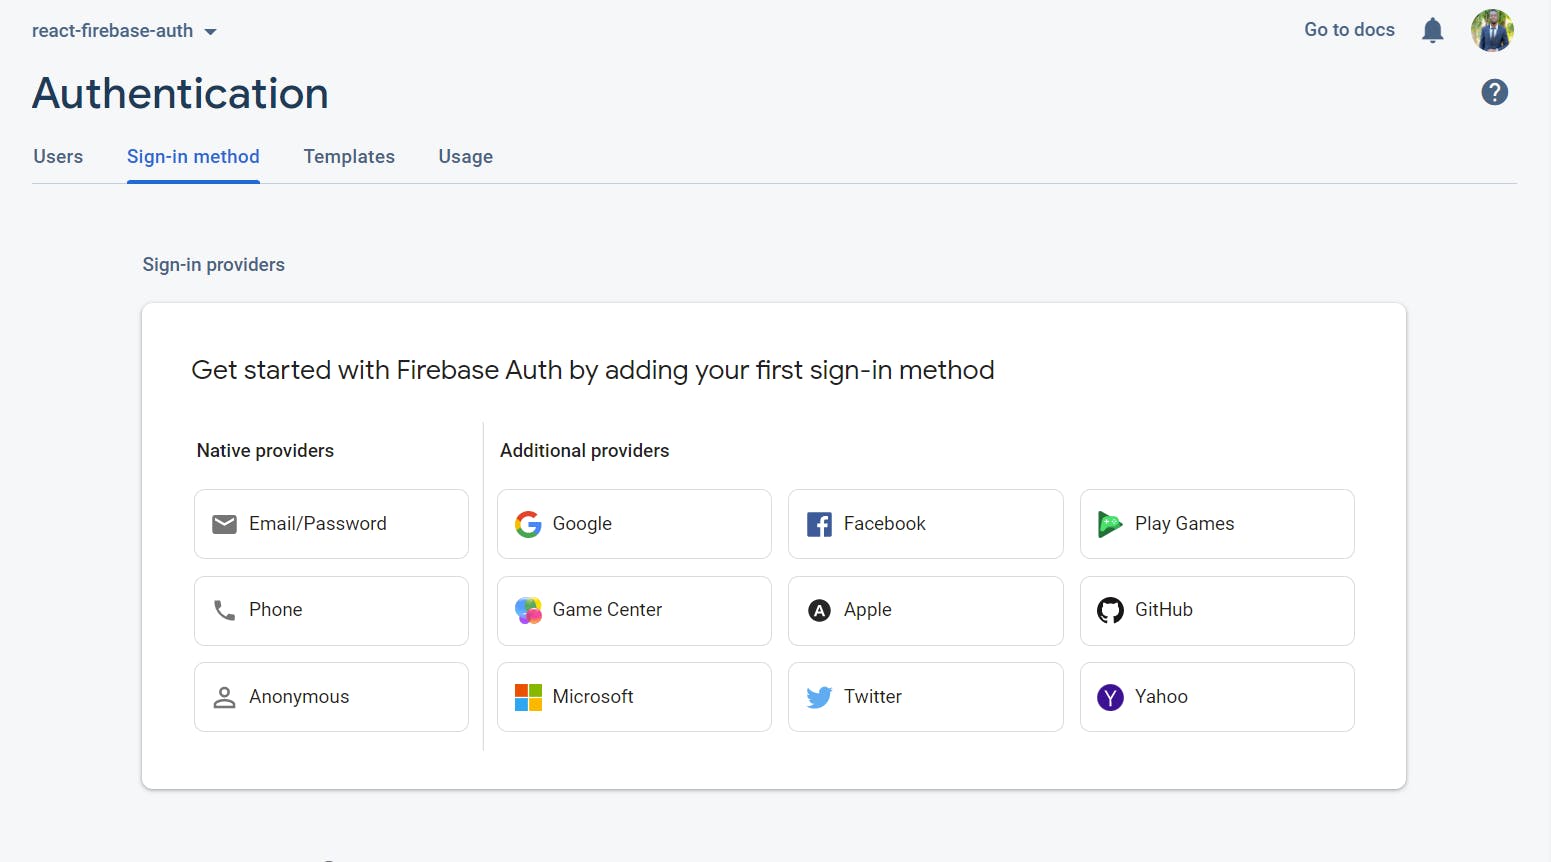
Proceed to select Email/Password and then Enable this and Save. Click Add new provider, then select Google and enable it. Also, provide a Project support email and then Save.
Enable cloud firestore
Cloud Firestore is a NoSQL database stored in the cloud that your iOS, Android, and web apps can access directly through native SDKs. Click on Firestore Database on the left-side menu and then click **Create database **, this modal below will pop up:
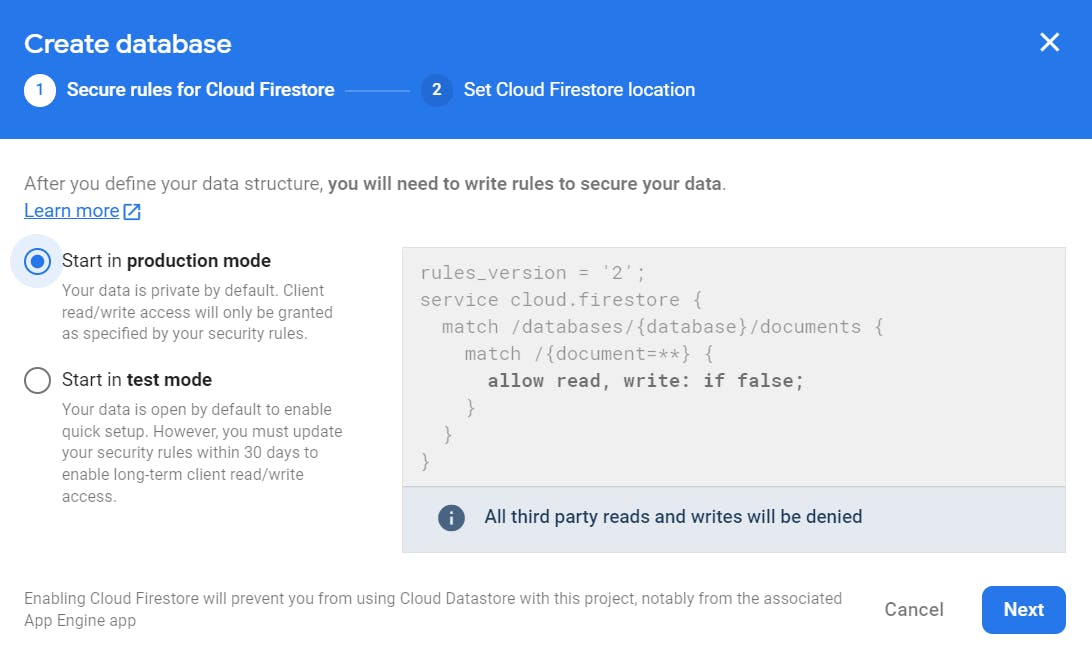
It's important to remember to start in test mode. Security rules must be configured in production-mode databases, which is beyond the scope of this tutorial.
Click Next. Select the Cloud Firestore location or leave it to the default, and then press Enable. Your Cloud Firestore database will be configured.
Integrating Firebase into our App
Go to project settings by clicking the gear icon in the left-side menu. Scroll down to add the project here:
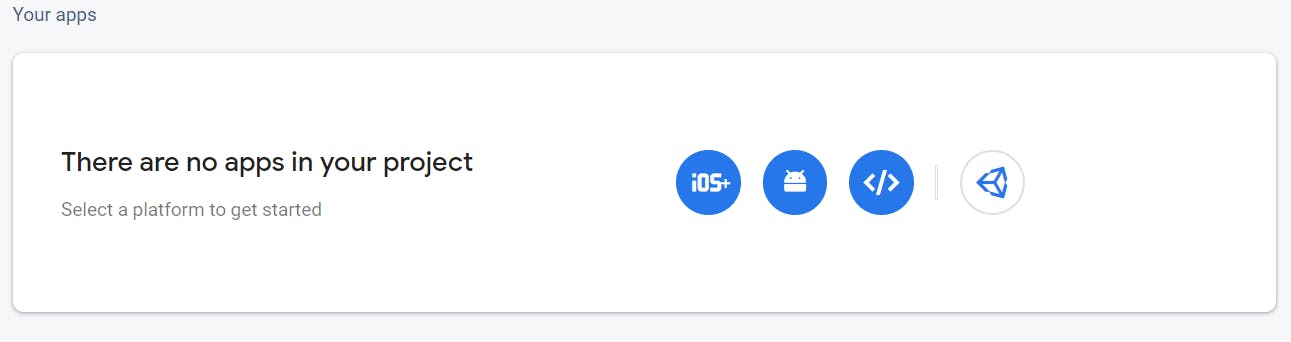
The third icon (</>), which denotes a web application, should be clicked. Give your app a name and then click Register app. Return to the project settings and copy the configuration.
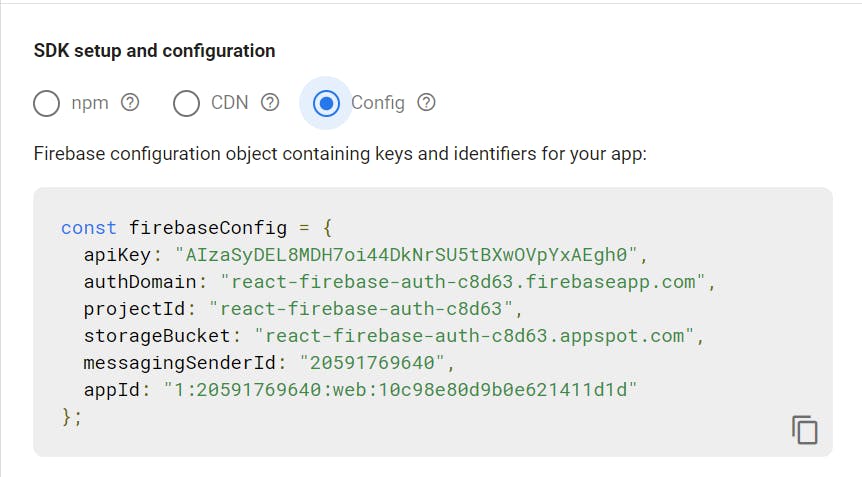
Copy the configuration. Create a new firebase-util.js file in the src folder. Now open the file and import all necessary functions from firebase:
import { initializeApp } from "firebase/app";
import {
GoogleAuthProvider,
getAuth,
signInWithPopup,
signInWithEmailAndPassword,
createUserWithEmailAndPassword,
sendPasswordResetEmail,
signOut,
} from "firebase/auth";
import {
getFirestore,
query,
getDocs,
collection,
where,
addDoc,
} from "firebase/firestore";
Simply add the configuration you just copied from the project setting. Set up your app and resources so that you can use Firebase across the app:
const app = initializeApp(firebaseConfig);
const auth = getAuth(app);
const db = getFirestore(app);
Now creating the authentication functions:
const googleProvider = new GoogleAuthProvider();
const signInWithGoogle = async () => {
  try {
    const response = await signInWithPopup(auth, googleProvider);
    const user = response.user;
    const querySnapshot= query(collection(db, "users"), where("uid", "==", user.uid)); // Pass the uid
    const doc = await getDocs(querySnapshot); // Pull the user details based on the uid
    if (doc.docs.length === 0) { // If the user doesn't exist
      await addDoc(collection(db, "users"), { // Create user with the parameters
        uid: user.uid,
        name: user.displayName,
        authProvider: "google",
        email: user.email,
      });
    }
  } catch (err) {
    console.error(err);
    alert(err.message);
  }
};
The GoogleAuthProvider provided by Firebase is used in the above code to assist with Google authentication. If an authentication error occurs, the user will be sent to the catch block. To tell Firebase that you want to log in through an external provider, you leverage Firebase's signInWithPopup() function and pass it to the Google provider.
The next step is to examine our Firestore database to determine if the authenticated user is present. If this is not the case, we generate a new record in our database.
Local storage is handled quite well by Firebase. The authentication will remain across page reloads, and Firebase will take care of it behind the scenes.
You can now proceed to create a sign-in function that uses an email address and a password:
const logInWithEmailAndPassword = async (email, password) => {
    try {
      await signInWithEmailAndPassword(auth, email, password);
    } catch (err) {
      console.error(err);
    }
};
For registered users, we can begin the authentication process. We just use the signInWithEmailAndPassword methods supplied by Firebase and pass email and password.
Now write a function to register a user with an email address and a password:
const signupWithEmailAndPassword = async (name, email, password) => {
  try {
    const res = await createUserWithEmailAndPassword(auth, email, password);
    const user = res.user;
    await addDoc(collection(db, "users"), {
      uid: user.uid,
      name,
      authProvider: "local",
      email,
    });
  } catch (err) {
    console.error(err);
  }
};
So here you just pass the name, email, and password of the user and create their record on your database.
When users forget their password, Firebase also gives you a simple function to add, that allows them to reset their password using a link delivered to their email.
const sendPasswordReset = async (email) => {
  try {
    await sendPasswordResetEmail(auth, email);
    console.log("Password reset link sent!");
  } catch (err) {
    console.error(err);
  }
};
Then finally, the logout function
const logout = () => {
  signOut(auth);
};
Afterward, you export all of the methods so you can use any where in the application.
export {
  auth,
  db,
  signInWithGoogle,
  logInWithEmailAndPassword,
  signupWithEmailAndPassword,
  sendPasswordReset,
  logout,
};
and your Firebase-util.js will finally look like this:
import { initializeApp } from "firebase/app";
import {
GoogleAuthProvider,
getAuth,
signInWithPopup,
signInWithEmailAndPassword,
createUserWithEmailAndPassword,
sendPasswordResetEmail,
signOut,
} from "firebase/auth";
import {
getFirestore,
query,
getDocs,
collection,
where,
addDoc,
} from "firebase/firestore";
const firebaseConfig = {
apiKey: "AIzaSyDEL8MDH7oi44DkNrSU5tBXwOVpYxAEgh0",
authDomain: "react-firebase-auth-c8d63.firebaseapp.com",
projectId: "react-firebase-auth-c8d63",
storageBucket: "react-firebase-auth-c8d63.appspot.com",
messagingSenderId: "20591769640",
appId: "1:20591769640:web:10c98e80d9b0e621411d1d"
};
const app = initializeApp(firebaseConfig);
const auth = getAuth(app);
const db = getFirestore(app);
const googleProvider = new GoogleAuthProvider();
const signInWithGoogle = async () => {
try {
const response = await signInWithPopup(auth, googleProvider);
const user = response.user;
const querySnapshot = query(collection(db, "users"), where("uid", "==", user.uid)); // Pass the uid
const doc = await getDocs(querySnapshot); // Pull the user details based on the uid
if (doc.docs.length === 0) { // If the user doesn't exist
await addDoc(collection(db, "users"), { // Create user with the parameters
uid: user.uid,
name: user.displayName,
authProvider: "google",
email: user.email,
});
}
} catch (err) {
console.error(err);
console.log(err.message);
}
};
const logInWithEmailAndPassword = async (email, password) => {
try {
await signInWithEmailAndPassword(auth, email, password);
} catch (err) {
console.error(err);
console.log(err.message);
}
};
const signupWithEmailAndPassword = async (name, email, password) => {
try {
const res = await createUserWithEmailAndPassword(auth, email, password);
const user = res.user;
await addDoc(collection(db, "users"), {
uid: user.uid,
name,
authProvider: "local",
email,
});
} catch (err) {
console.error(err);
alert(err.message);
}
};
const sendPasswordReset = async (email) => {
try {
await sendPasswordResetEmail(auth, email);
console.log("Password reset link sent!");
} catch (err) {
console.error(err);
console.log(err.message);
}
};
const logout = () => {
signOut(auth);
};
export {
auth,
db,
signInWithGoogle,
logInWithEmailAndPassword,
signupWithEmailAndPassword,
sendPasswordReset,
logout
};
Implementing login functionality
Adding login functionality to our login component
import React, { useEffect, useState } from "react";
import { Link, useNavigate } from "react-router-dom";
import { auth, logInWithEmailAndPassword, signInWithGoogle } from "./firebase-util";
import { useAuthState } from "react-firebase-hooks/auth";
Here we added all the necessary imports we will use, this includes React hooks and firebase methods.
  const [email, setEmail] = useState("");
  const [password, setPassword] = useState("");
  const [user, loading, error] = useAuthState(auth);
  const navigate = useNavigate();

  useEffect(() => {
    if (loading) return;
    if (user) navigate("/dashboard");
  }, [user, loading]);
Inside the login function, you utilize useState for holding the values for email and password. useAuthState holds data based on what was received from firebase. You check if there's a user and navigate the user to the dashboard using useNavigate;
<label htmlFor="email" className="email">E-mail </label>
<input
className="inp-left"
type="email"
placeholder="example@gmail.com"
id="email"
name="email"
value={email}
onChange={(e) => setEmail(e.target.value)}
/>
<label htmlFor="password" className="pass">Password </label>
<input
className="inp-left"
type="password"
placeholder="password"
name="password"
id="password"
value={password}
onChange={(e) => setPassword(e.target.value)}
/>

<button className="btn-one"
onClick={() => logInWithEmailAndPassword(email, password)}>
   Login
</button>
<button className="btn-two"
onClick={signInWithGoogle}>
   Sign in with google
</button>
Finally, you handle the form inputs and button click to call the necessary methods to log in the user.
Implementing register functionality
Adding registration functionality in our register component
import React, { useEffect, useState } from "react";
import { useAuthState } from "react-firebase-hooks/auth";
import {
  auth,
  signupWithEmailAndPassword,
  signInWithGoogle,
} from "./firebase-util";
import { Link, useNavigate } from "react-router-dom";
You do all the necessary imports, just like was done above.
  const [name, setName] = useState("");
  const [email, setEmail] = useState("");
  const [password, setPassword] = useState("");

  const [user, loading, error] = useAuthState(auth);
  const navigate = useNavigate();

  const registerUser = () => {
    if (!name || !email || !password) {
      alert("Please enter all details");
      return;
    }
    signupWithEmailAndPassword(name, email, password);
  };

  useEffect(() => {
    if (loading) return;
    if (user) navigate("/dashboard");
  }, [user, loading]);
You implement all methods and hooks just like before and add validation in the register user function to avoid sending empty data.
<label htmlFor="name" className="name">Name </label>
<input
className="inp-left"
type="text"
placeholder="John Doe"
id="name"
name="displayName"
value={name}
onChange={(e) => setName(e.target.value)}
/>
<label htmlFor="email" className="email">E-mail </label>
<input
className="inp-left"
type="email"
placeholder="example@gmail.com"
id="email"
name="email"
value={email}
onChange={(e) => setEmail(e.target.value)}
/>
<label htmlFor="password" className="pass">Password </label>
<input
className="inp-left"
type="password"
placeholder="password"
name="password"
id="password"
value={password}
onChange={(e) => setPassword(e.target.value)}
/>
<button className="btn-one" onClick={registerUser}>Register</button>
<button className="btn-two" onClick={signInWithGoogle}>
Sign up with google
</button>
We handle form inputs and button clicks to create the user in our database.
Implementing dashboard functionality
In the dashboard component, we want to just display just the name of the logged-in and a logout button.
import React, { useEffect, useState } from "react";
import { useNavigate } from "react-router-dom";
import { useAuthState } from "react-firebase-hooks/auth";
import { auth, db, logout } from "./firebase-util";
import { query, collection, getDocs, where } from "firebase/firestore";

import './dashboard.css';

const Dashboard = () => {
    const [user, loading, error] = useAuthState(auth);
    const [name, setName] = useState("");
    const navigate = useNavigate();
    const fetchUserDetails = async () => {
        try {
          const querySnapshot = query(collection(db, "users"), where("uid", "==", user?.uid));
          const doc = await getDocs(querySnapshot);
          const data = doc.docs[0].data();
          setName(data.name);
        } catch (err) {
          console.error(err);
        }
      };

      useEffect(() => {
        if (loading) return;
        if (!user) return navigate("/");
        fetchUserDetails();
      }, [user, loading]);
    return (
        <div className="dashboard-container">
            <div className="inner">
                <h4>Welcome, {name}</h4> <br />
                <button className="logout" onClick={logout}>Log out</button>
            </div>
        </div>
    )
 }

 export default Dashboard
We are checking the database to pull user records based on uid or redirect the user back to the login page if no data exist. We also implement log-out by simply calling the logout method firebase already provided.
Implement reset password functionality
This follows almost the same pattern as other functionalities already implemented.
import React, { useEffect, useState } from "react";
import { useNavigate } from "react-router-dom";
import { useAuthState } from "react-firebase-hooks/auth";
import { auth, sendPasswordReset } from "./firebase-util";
You add the needed imports.
  const [email, setEmail] = useState("");
  const [user, loading, error] = useAuthState(auth);
  const navigate = useNavigate();
  useEffect(() => {
    if (loading) return;
    if (user) navigate("/dashboard");
  }, [user, loading]);
Add all necessary hooks.
Then finally handle input and button.
<label htmlFor="email" className="email">E-mail </label>
<input
className="inp-left"
type="email"
placeholder="example@gmail.com"
id="email"
name="email"
value={email}
onChange={(e) => setEmail(e.target.value)}
/>

<button className="btn-one" onClick={() => sendPasswordReset(email)}>Reset Password</button>
You are through with all integrations and your app should just work fine. You can proceed to improve the user experience by adding preloaders and toast messages where necessary.
Conclusion
In this article, you utilized Firebase as a backend alternative to handle user authentication in a React application. You learned how to register, log in and reset users' passwords without needing to write any backend code.