

CSS (Cascading Style Sheets) is an essential component of web development because it allows for the styling of websites. The benefit of CSS is that it enables developers to segregate their web pages' presentation from their content. Because of this distinction, web developers can quickly change a web page's style without altering its content.
Specificity is one of the most fundamental CSS concepts. When more than one CSS rule may apply to an element, specificity is a method of choosing which rule(s) to put into effect. To create CSS code that is fast, consistent, and maintainable, developers must comprehend specificity.
In this article, you will thoroughly examine CSS specificity. You will comprehend what specificity is, how it's determined, and how to use it efficiently while creating CSS code.
What does CSS specificity mean?
CSS specificity is a set of guidelines that dictate which CSS rules are applied to an element when several CSS rules conflict. In other words, it is a way to predict which conflicting styles would prevail.
The selectors that are used to apply styles to an element establish CSS specificity. As a general rule, the more detailed a selector, the more significance it bears. The selector's importance increases with specificity, and priority is given to the selector with enormous weight.
Specificity is crucial due to its ability to ensure that CSS rules are applied as intended. It is paramount to understand which CSS rule will be applied first when numerous CSS rules are applied to the same element. Additionally, specificity aids in the creation of maintainable and understandable CSS code.
How Specificity is Determined
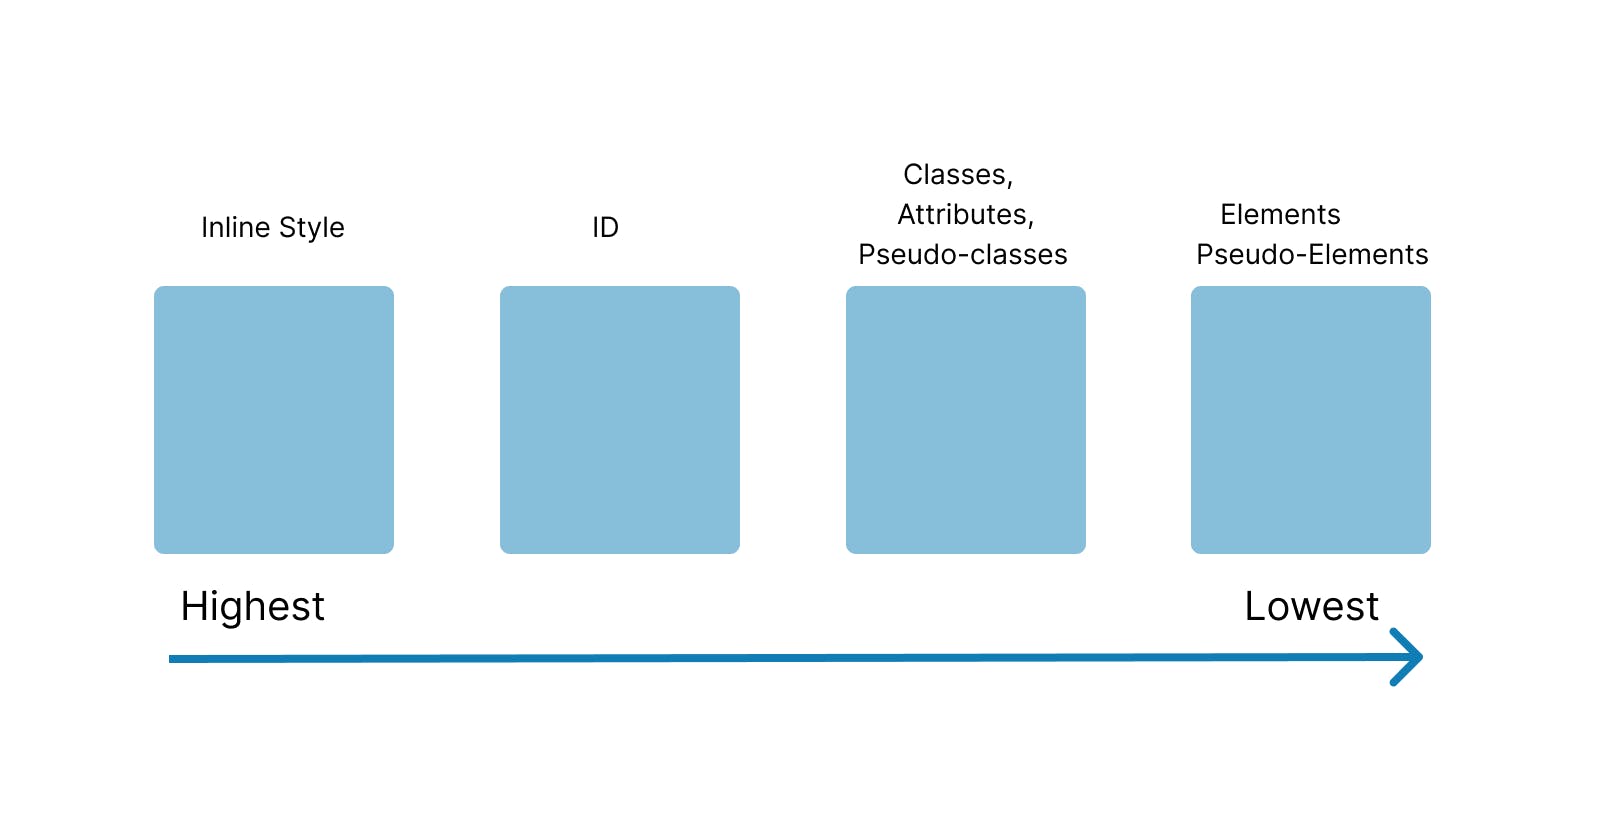
The kinds of selectors used in a CSS rule are used to calculate the specificity. In CSS, there are four different categories of selectors, each with a distinct degree of specificity. The four different categories of selectors are:
Type Selectors: Type selectors are selectors that aim for a particular HTML element, such as h1, p, or div. Type selectors have a specificity of 0, 0, 1.
Class Selectors: Class selectors are types of selectors that aim to choose elements with a particular class, such as
.my-class. Class selectors have a specificity of 0, 1, 0.ID Selectors: These are selectors that aim for elements with a particular ID, such as
#my-id. Selectors for IDs have a specificity of 1, 0, 0.Inline styles: These are styles that are applied directly to an HTML element through the use of the style attribute. The specificity of inline styles is 1, 0, 0, 0.
Selector specificities are added together when used in a CSS rule to determine the specificity of the rule. For instance, the CSS rule h1.my-class#my-id has a specificity of 1, 1, 1 since it has one ID selector, one class selection, and one type selector.
The final rule in the stylesheet takes precedence if there are two or more CSS rules with the same specificity. The rule with the highest specificity wins, though, if one or more selectors are more particular than the others.
Note: The specificity value for inline style is 1, 0, 0, 0, and it is always given the highest priority. But there is one exception to this rule if you utilize !important, it will even take precedence over inline styles.
Here are some examples to help you better grasp how CSS specificity functions.
Example 1: Type Selector vs. Class Selector
/* Type selector */
p { color: blue; }

/* Class selector */
.my-class { color: red; }
The class selector in this instance is more specific than the type selector. Therefore, despite the type selector setting the text color to blue, any <p> element with the class my-class will have red text.
Example 2: ID Selector vs. Class Selector
/* ID selector */
#my-id { color: green; }

/* Class selector */
.my-class { color: red; }
The ID selector in this instance is more specific than the class selector. Therefore, despite the class selector setting the text color to red, any element with the ID my-id will have green text.
Example 3: Inline Style vs. ID Selector
/* Inline Style */
<div id="my-div" style="color: red;">Red div!</div>
/* ID selector */
#my-div { color: green; }
In this case, the specificity of the inline style is 1, 0, 0, 0, which is greater than the specificity of the ID selector, which is 1, 0, 0. In spite of the ID selection setting the text color to green, the <div> element will have red text.
Example 4: Several Selectors with Distinct Specificities
/* ID selector */
#my-div { color: green; }

/* Class selector */
.my-class { color: red; }

/* Type selector */
div { color: blue; }
The ID selector in this illustration is the most specific, followed by the class selector and then the type selector. Consequently, regardless of whether it is a <div> element or has the class my-class, any element with the ID my-div will have green text.
Example 5: !important
/* Class selector with important */
.my-class { color: red !important; }

/* ID selector */
#my-div { color: green; }
The default specificity rules are overridden in this instance by the use of the keyword !important. The ID selector is more specific than the class selector, but the !important keyword gives the class selector the greatest level of specificity, resulting in red text being displayed on any element with the class my-class, regardless of whether it has an ID my-div.
Conclusion
Writing effective, manageable, and consistent CSS code requires web developers to have a solid understanding of CSS specificity. The selectors that are used in a CSS rule determine how specific it is. The specificity of the rule increases with selector specificity. When more than one rule may apply to an element, the rule with the greatest degree of specificity is given priority.
Understanding the laws of specificity and utilizing them to your advantage is essential for writing efficient CSS code. By doing this, you can make sure that all devices and browsers display your web pages properly and that your CSS styles are applied as anticipated.